How to Build Wall Shelves for Corner Spaces to Save Space
Corner spaces in a room can often feel like wasted real estate. However, these often-overlooked areas can be transformed into valuable storage solutions with the addition of custom-built wall shelves. Corner shelves offer a unique opportunity to maximize space and add a touch of personality to your home decor.
Building wall shelves for corner spaces is a relatively straightforward DIY project that requires minimal tools and materials. This guide will provide you with a step-by-step process, from planning to installation, to help you successfully create functional and stylish shelves in your home.
Planning Your Corner Shelves
Before embarking on your shelving project, careful planning is essential to ensure a successful outcome. Consider the following factors:
1. Purpose and Use
Determine the primary purpose of the shelves. Will they be used for books, decorative items, or a combination of both? Knowing the intended use will influence your design decisions, such as the shelf depth and material choice.
2. Shelf Dimensions
Measure the corner space carefully to determine the maximum dimensions for your shelves. Consider the available wall space, the size of the corner, and the overall aesthetic of the room.
3. Shelf Number and Placement
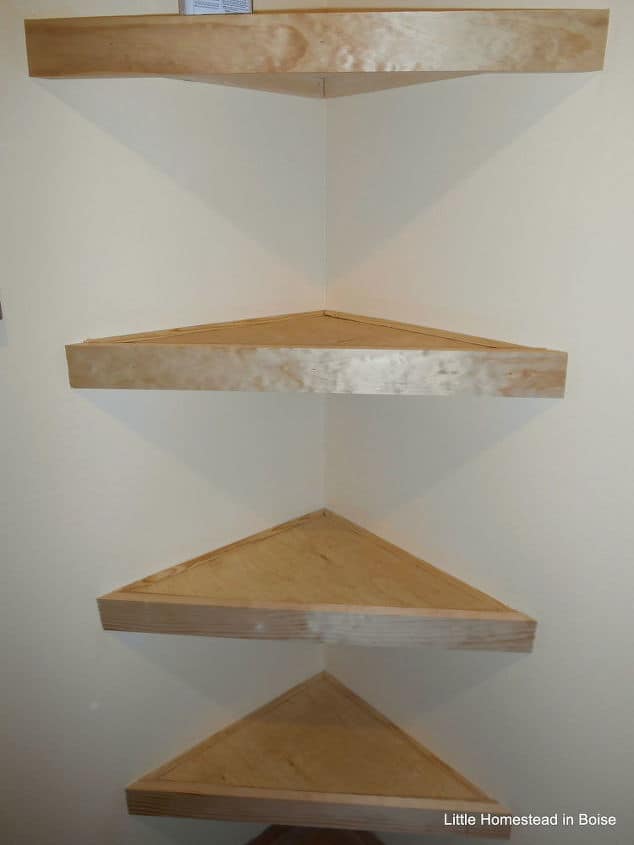
Decide on the number of shelves you need and their placement within the corner. Factor in the height of your items and the desired visual impact. Creating shelves of different lengths can add visual interest and create a unique look.
4. Materials and Style
Choose the appropriate materials for your shelves based on their intended use and the style of your home. Popular choices include:
- Wood: Durable, versatile, and available in various finishes.
- Metal: Modern and industrial look, often used for open shelving.
- Glass: Creates a minimalist and contemporary feel.
- Acrylic: Lightweight and transparent, offering a modern and sleek appearance.
5. Shelf Brackets
Select sturdy shelf brackets that match the material and style of your shelves. Ensure that the brackets are rated for the weight you intend to place on the shelves. Options include:
- Metal brackets: Offer a robust and durable solution.
- Wood brackets: Provide a natural and rustic aesthetic.
- Hidden brackets: Ideal for a clean and minimalist look.
Building Your Corner Shelves
Once you have a clear plan, it's time to gather the necessary tools and materials and start building your shelves.
1. Gather Tools and Materials
You'll need the following tools and materials for this project:
- Saw: For cutting wood or other materials to size.
- Drill: For drilling pilot holes and attaching brackets.
- Screwdriver: For securing brackets and shelves.
- Level: To ensure that shelves are straight and even.
- Tape measure: For accurate measurements.
- Pencil: For marking cutting lines.
- Sandpaper: To smooth edges and prepare surfaces for finishing.
- Wood glue: To enhance strength and durability.
- Wood stain or paint (optional): For customizing the finish.
- Shelves: Pre-cut or cut to size.
- Brackets: Chosen based on your design.
- Screws: For attaching brackets and shelves.
- Wall anchors (optional): For securing brackets to drywall.
2. Cut and Prepare Shelf Material
If using pre-cut shelf material, skip this step. Otherwise, carefully measure and cut your shelves to the desired dimensions using a saw. Sand down all edges to create smooth and safe surfaces.
3. Install Shelf Brackets
Choose the location for your brackets. For corner shelves, you may need to install two brackets per shelf, one on each wall. Using a level, mark the bracket positions on the wall with a pencil.
If you are installing brackets into drywall, pre-drill pilot holes to prevent cracking. If the wall is solid, you may not need to drill pilot holes. Install the brackets using screws, ensuring they are securely attached to the wall. Make sure the brackets are level and properly positioned before attaching the shelves.
4. Attach Shelves
Carefully place the shelves onto the brackets, ensuring they are level and secure. If using wood shelves, consider adding a small amount of wood glue to the top of the brackets for extra strength. Secure the shelves to the brackets using screws, ensuring they are properly positioned and flush against the wall.
5. Finish and Decorate
Once the shelves are installed, you can add a final touch by staining or painting them to match your existing decor. Apply the finish evenly, and allow it to dry completely before placing any items on the shelves.
Tips for Successful Corner Shelf Construction
- Measure twice, cut once: Accurate measurements are crucial for a successful project. Ensure all measurements are double-checked before making any cuts.
- Use sturdy materials: Select strong and durable shelf materials and brackets to support the intended weight.
- Consider weight distribution: Ensure the weight distribution is balanced on each shelf. Heavy items should be placed near the center to prevent shelves from sagging.
- Use a level: A level is essential to ensure that your shelves are straight and even. Take the time to double-check and adjust the shelves until they are perfectly level.
- Choose the right screws: Select screws that are long enough to penetrate the wall and secure the brackets properly. If attaching brackets to drywall, consider using wall anchors for extra support.
- Safety first: Always wear safety glasses and gloves when using power tools. Be cautious when working with sharp tools and heavy objects.
Conclusion
By following this guide, you can build stylish and functional corner shelves to maximize your space and create a unique focal point in your home. The process is achievable for DIY enthusiasts of all skill levels and offers a rewarding way to enhance the look and functionality of any room.
0 comments:
Post a Comment