Wednesday, November 20, 2024

Simple Wooden Christmas Crafts for the Family

Simple Wooden Christmas Crafts for the Family

Simple Wooden Christmas Crafts for the Family

Christmas is a time for family, friends, and creating memories that will last a lifetime. And what better way to bond with your loved ones than by creating something special together?

Wooden crafts offer a unique charm and warmth that perfectly embody the spirit of Christmas. They're versatile, durable, and can be decorated in countless ways. Plus, they're a great way to unleash your creativity and have some fun!

In this article, we'll explore a variety of simple wooden Christmas crafts that are perfect for families with kids of all ages. We'll provide detailed instructions, tips, and inspiration to help you create beautiful and meaningful decorations for your home.

Wooden Christmas Ornaments

Creating wooden ornaments is a classic Christmas craft that's always a hit with kids. They're simple to make, and the possibilities for decoration are endless.

Materials You'll Need

  • Wooden ornament shapes (circles, stars, snowflakes, etc.)
  • Acrylic paints in festive colors
  • Paintbrushes
  • Glitter glue or glitter
  • Sequins, beads, or other embellishments
  • String or ribbon for hanging

Instructions

  1. Paint the wooden ornaments with your chosen colors. Let them dry completely.
  2. Once the paint is dry, get creative! Add glitter glue, sequins, beads, or any other embellishments you like. You can use stencils to create patterns or freehand designs.
  3. Once your ornaments are decorated, tie a string or ribbon to the top for hanging.

Tips

  • Use a variety of textures and colors to create unique and interesting ornaments.
  • Let your kids personalize their ornaments with their own names or initials.
  • Hang your ornaments on a Christmas tree, window, or even as a festive garland.

Wooden Christmas Tree Decorations

Wooden Christmas tree decorations are a fun and easy way to add a rustic touch to your holiday decor. They can be painted, stained, or left natural, depending on your preference.

Materials You'll Need

  • Wooden shapes (stars, snowflakes, hearts, etc.)
  • Paint or stain (optional)
  • Paintbrushes
  • Twine or ribbon for hanging

Instructions

  1. If desired, paint or stain the wooden shapes. Let them dry completely.
  2. Tie a piece of twine or ribbon to the top of each shape for hanging.
  3. Hang your decorations on your Christmas tree or use them as festive accents around your home.

Tips

  • Get creative with your shapes! Use wooden circles, squares, or even small pieces of driftwood.
  • Add a personal touch by writing messages or names on the decorations.
  • Combine different sizes and shapes for a visually appealing display.

Wooden Christmas Village

Building a wooden Christmas village is a delightful family project that can be enjoyed for years to come. You can purchase pre-made wooden houses or create your own from scratch using simple materials.

Materials You'll Need

  • Wooden house kits or materials for building houses (cardboard boxes, wood scraps, etc.)
  • Paint or stain (optional)
  • Paintbrushes
  • Glitter, sequins, or other embellishments
  • Glue
  • LED lights (optional)
  • A base for your village (a piece of plywood, cardboard, or even a tray)

Instructions

  1. If you're using wooden house kits, follow the instructions provided. If you're building your own houses, use cardboard boxes, wood scraps, or other materials you have on hand.
  2. Paint or stain the houses to your liking. Let them dry completely.
  3. Decorate the houses with glitter, sequins, or other embellishments. You can also add tiny Christmas trees, miniature snowmen, or other festive touches.
  4. Once your houses are decorated, glue them to the base of your village. You can arrange them in any way you like.
  5. Add LED lights for a magical glow. You can use battery-operated lights or plug-in lights, depending on your preference.

Tips

  • Use different sizes and styles of houses to create a charming and varied village.
  • Add details like fences, trees, and sidewalks to create a realistic scene.
  • Let your kids help with the decorating and building process to make it a truly family affair.

Wooden Christmas Advent Calendar

A wooden Advent calendar is a beautiful and unique way to countdown the days until Christmas. It can be made from scratch or purchased pre-made, and decorated to your liking.

Materials You'll Need

  • Wooden Advent calendar or materials for building one (wood scraps, cardboard, etc.)
  • Paint or stain (optional)
  • Paintbrushes
  • Numbers 1-24
  • Small gifts or treats for each day

Instructions

  1. If you're using a pre-made wooden Advent calendar, paint or stain it according to your preference. Let it dry completely.
  2. If you're building your own Advent calendar, use wood scraps or cardboard to create a grid with 24 squares.
  3. Paint or stain the squares, then attach the numbers 1-24 to each square.
  4. Place a small gift or treat behind each numbered square.

Tips

  • You can personalize your Advent calendar by using pictures or messages instead of numbers.
  • Use a variety of small gifts, treats, or even activities for each day.
  • Place your Advent calendar in a prominent location in your home so everyone can enjoy it.

Wooden Christmas Gift Tags

Wooden Christmas gift tags add a touch of rustic charm to your presents. They're easy to make and can be personalized with names, messages, or even a little bit of holiday cheer.

Materials You'll Need

  • Wooden gift tags
  • Paint or stain (optional)
  • Paintbrushes
  • Twine or ribbon for hanging
  • Markers or stamps for writing messages

Instructions

  1. If desired, paint or stain the wooden gift tags. Let them dry completely.
  2. Write names, messages, or festive greetings on the gift tags with markers or stamps.
  3. Tie a piece of twine or ribbon to the top of each tag for hanging.
  4. Attach the tags to your gifts.

Tips

  • Use different colors and designs for each gift tag to add a touch of whimsy.
  • Get creative with your messages! You can write funny jokes, heartfelt wishes, or even personalized poems.
  • Add embellishments like glitter, sequins, or even tiny Christmas trees to your gift tags.

Commonly Asked Questions

Here are some frequently asked questions about wooden Christmas crafts:

  • Where can I find wooden craft supplies? You can find wooden craft supplies at most craft stores, online retailers, and even some hardware stores. Look for wood blanks, ornaments, and other shapes designed specifically for crafting.
  • What kind of paint is best for wooden crafts? Acrylic paint is a great choice for wooden crafts because it's durable, easy to use, and comes in a wide variety of colors. You can also use other types of paint, such as watercolor or oil paint, depending on the desired effect.
  • What are some tips for making wooden Christmas crafts with kids? Be patient and encouraging! Let your kids explore their creativity and don't worry about perfection. Provide clear instructions and help them with any tricky steps. Most importantly, have fun!
  • What are some other wooden Christmas crafts I can try? You can also try making wooden reindeer, snowmen, or even a wooden Christmas wreath. The possibilities are endless!
Continue reading

DIY Lawn Chair Projects for Outdoor Events and Gatherings

DIY Lawn Chair Projects for Outdoor Events and Gatherings

DIY Lawn Chair Projects for Outdoor Events and Gatherings

Hey there, outdoor enthusiasts! Planning a backyard bash, a picnic in the park, or a casual get-together with friends? Let's face it, comfortable seating is essential for any outdoor event. But who wants to spend a fortune on fancy chairs that might only get used once? That's where DIY lawn chair projects come in! Not only are they budget-friendly, but they're also a great way to personalize your space and add a touch of charm to your gathering.

Getting Creative with Chair Transformations

The beauty of DIY lawn chair projects is the endless possibilities. You can take those basic folding chairs you have lying around and transform them into something spectacular. Let your imagination run wild! Here are some fun ideas to get you started:

The Fabric Fix

A quick and easy way to revamp old lawn chairs is with fabric. Grab some colorful fabric, a staple gun, and get ready to personalize! You can cover the entire chair, just the seat, or even create fun accent panels. Choose a pattern that complements your outdoor décor, and watch your chairs come to life.

Here are some tips for fabric-covered chairs:

  • Use a fabric that's weather-resistant and easy to clean.
  • Consider adding padding for extra comfort.
  • Make sure the fabric is securely attached with staples.

Painting Your Way to Style

A simple coat of paint can make a world of difference. Choose a bright color for a pop of fun, or go for a more subtle, weathered look. You can even try stenciling designs or using chalkboard paint for a personalized touch. Just be sure to use outdoor paint that's durable and weather-resistant.

Here's how to paint your chairs like a pro:

  • Clean your chairs thoroughly before painting.
  • Sand the surface for a smooth finish.
  • Use a primer for better adhesion and coverage.
  • Apply multiple thin coats of paint for the best results.

Beyond the Basics

Feeling adventurous? Let's go beyond the basic chair makeover!

  • Add a canopy: Create a cozy spot to relax by adding a canopy over your chair. Use a simple fabric drape, a DIY awning, or even a piece of bamboo.
  • Turn it into a hammock: For ultimate comfort, try converting your chair into a hammock. This requires a little more work but can be a rewarding project. You'll need sturdy ropes and a suspension system.
  • Create a comfy lounge chair: Add cushions, pillows, and a cozy throw blanket to transform your simple chair into a luxurious lounge chair.

DIY Lawn Chair Projects for Every Skill Level

Ready to tackle some projects? Here's a breakdown of different DIY lawn chair ideas, categorized by skill level.

Beginner-Friendly Projects

These projects are perfect for those who are new to DIY or have limited time and tools. You can get these projects done quickly and easily.

  • Fabric makeover: Cover your chairs in bright, patterned fabric.
  • Painted chairs: Give your chairs a fresh coat of paint in your favorite color.
  • Decorative additions: Attach colorful ribbons, buttons, or beads to your chairs for a unique look.

Intermediate-Level Projects

These projects require a bit more time, effort, and maybe a few more tools. But they're well worth the extra work!

  • Stenciled designs: Use a stencil to add a unique design to your chairs.
  • Chalkboard paint: Transform your chairs into chalkboard masterpieces.
  • Upcycled materials: Use salvaged wood, fabric scraps, or other found items to create unique chairs.

Advanced Projects

Ready for a challenge? These projects require more advanced skills and tools.

  • Custom-built chairs: Design and build your own lawn chairs from scratch.
  • Hammock conversion: Turn your chairs into comfy hammocks.
  • Multi-functional chairs: Create chairs with built-in storage, side tables, or other features.

Essential Tools and Supplies

Here are some basic tools and supplies that you'll likely need for your DIY lawn chair projects:

  • Screwdriver: For assembling and disassembling chairs.
  • Hammer: For driving nails or staples.
  • Staple gun: For attaching fabric to chairs.
  • Measuring tape: For accurate measurements.
  • Paint brushes: For applying paint to chairs.
  • Sandpaper: For smoothing surfaces before painting.
  • Fabric: For covering chairs.
  • Paint: For painting chairs.
  • Cushions: For adding comfort.
  • Safety glasses: For eye protection.

Safety First

Remember, safety is always paramount! Always use caution when working with tools and follow manufacturer instructions carefully. It's a good idea to have a first-aid kit on hand just in case.

Tips for Success

To ensure your DIY projects are a hit, consider these tips:

  • Plan ahead: Sketch out your design before you start to avoid any surprises.
  • Gather your materials: Make sure you have all the necessary tools and supplies on hand.
  • Work in a well-ventilated area: Especially when using paint or adhesives.
  • Take breaks: Don't rush your project. Take breaks to avoid fatigue and ensure your work is accurate.
  • Have fun: Enjoy the creative process and let your personality shine through.

Commonly Asked Questions

Here are some common questions about DIY lawn chair projects:

  • What kind of paint should I use? Use outdoor paint that's specifically designed for furniture. This paint is weather-resistant and durable.
  • What kind of fabric is best for covering chairs? Choose a fabric that's weather-resistant, easy to clean, and durable. Some good options include canvas, cotton duck, and outdoor upholstery fabric.
  • How can I make my chairs more comfortable? Add cushions, pillows, or a cozy throw blanket to your chairs for extra comfort.
  • What are some creative ways to use upcycled materials? Consider using salvaged wood, fabric scraps, or even old magazines to add a unique touch to your chairs.
  • Where can I find inspiration for DIY lawn chair projects? Check out online resources like Pinterest and YouTube, as well as craft stores and magazines.

So there you have it! With a little creativity and some DIY know-how, you can transform ordinary lawn chairs into stylish and comfortable seating for all your outdoor gatherings. Get ready for a summer full of fun and laughter, all thanks to your personalized chair creations!

Continue reading

Tuesday, November 19, 2024

Stylish Wooden Floating Shelves That Shoppers Love

Stylish Wooden Floating Shelves That Shoppers Love

Stylish Wooden Floating Shelves That Shoppers Love

Floating shelves have become a popular choice for homeowners looking to add a touch of style and functionality to their living spaces. These innovative shelves offer a clean, minimalist aesthetic that can enhance any décor, while providing ample storage solutions. Among the many materials used for floating shelves, wood stands out as a timeless and versatile option that seamlessly blends with various design styles.

The allure of wooden floating shelves lies in their ability to effortlessly elevate the visual appeal of any room. Whether you're aiming for a rustic charm, modern sophistication, or a touch of Scandinavian minimalism, wooden shelves can complement your vision beautifully. But with a vast array of choices available, it can be daunting to navigate the world of wooden floating shelves and select the perfect ones for your home.

To help you embark on your shopping journey, we've compiled a list of stylish wooden floating shelves that have captured the hearts of shoppers and earned rave reviews. These shelves not only boast exceptional craftsmanship and durability but also possess a unique charm that will undoubtedly enhance the ambiance of your home.

Top Picks for Stylish Wooden Floating Shelves

1. Rustic Farmhouse Floating Shelves

For a touch of cozy charm, rustic farmhouse floating shelves are an excellent choice. Crafted from reclaimed wood with visible knots and grain patterns, these shelves exude a sense of warmth and character. They are ideal for showcasing rustic décor items, plants, and family photos, adding a touch of nostalgia to your space.

  • Pros: Unique character, adds warmth and charm, perfect for rustic or farmhouse style.
  • Cons: Can be heavy, may require extra support for heavier items.

2. Modern Walnut Floating Shelves

If you're seeking a sleek and contemporary look, modern walnut floating shelves are a perfect fit. Walnut wood's rich, dark hue adds a touch of sophistication and elegance to any room. These shelves are ideal for showcasing modern art, minimalist décor, and sleek home accessories.

  • Pros: Elegant and modern aesthetic, versatile for various décor styles, durable and long-lasting.
  • Cons: Can be pricey, may require specialized installation.

3. Scandinavian White Floating Shelves

Embrace the minimalist charm of Scandinavian design with white floating shelves. Crafted from birch or pinewood, these shelves offer a clean and airy aesthetic, perfect for creating a light and spacious feel. They blend seamlessly with various décor styles, from minimalist to bohemian, adding a touch of sophistication without overwhelming the space.

  • Pros: Light and airy feel, minimalist and clean aesthetic, versatile for different décor styles.
  • Cons: Can be susceptible to scratches and dents, may require more careful handling.

4. Industrial Metal & Wood Floating Shelves

Combine the industrial chic of metal with the warmth of wood with industrial metal & wood floating shelves. These shelves feature a combination of reclaimed wood and exposed metal brackets, creating a unique contrast that adds a touch of edge to any room. They are ideal for showcasing industrial-inspired décor, vintage finds, and urban-themed accessories.

  • Pros: Unique and eclectic style, durable and long-lasting, perfect for industrial or modern décor.
  • Cons: Can be heavy, may require specialized installation.

5. Live Edge Floating Shelves

Embrace the beauty of natural wood with live edge floating shelves. These shelves feature the natural, unrefined edge of the wood, showcasing its unique character and grain patterns. Live edge shelves add a touch of organic charm to any space, making them ideal for showcasing natural elements, plants, and handcrafted items.

  • Pros: Unique and natural beauty, adds warmth and character, perfect for rustic or bohemian décor.
  • Cons: Can be expensive, may require special care and maintenance.

Factors to Consider When Choosing Wooden Floating Shelves

While the visual appeal of wooden floating shelves is undeniable, it's essential to consider other factors to ensure you choose the right ones for your needs. Here are some crucial aspects to keep in mind:

1. Wood Type and Finish

Wood type and finish play a significant role in the overall aesthetic and durability of your shelves.

  • Hardwoods: Oak, walnut, and maple are known for their strength, durability, and beautiful grain patterns. They offer a timeless appeal and can withstand wear and tear.
  • Softwoods: Pine and cedar are lighter and less expensive, providing a rustic charm. However, they may be more susceptible to scratches and dents.
  • Finishes: Consider finishes like stain, varnish, or paint. Stain enhances the natural grain patterns, while varnish provides a protective coating. Paint allows you to customize the shelves to match your existing décor.

2. Shelf Size and Depth

The size and depth of the shelves are crucial factors to consider based on the items you intend to display.

  • Width: Choose shelves wide enough to accommodate your belongings without appearing overcrowded.
  • Depth: Select a depth that allows for sufficient space to display items without them falling over.

3. Mounting System

Understanding the mounting system of the shelves is essential for ensuring a secure and stable installation.

  • Hidden Brackets: These offer a clean and minimalist look, seamlessly blending with the shelf.
  • Visible Brackets: These can add a decorative element to the shelves, especially if they are made of metal or wood.

4. Weight Capacity

Pay attention to the weight capacity of the shelves, especially if you plan to display heavy items. Choose shelves with a weight capacity that meets your needs to avoid any accidents or damage.

Tips for Styling Wooden Floating Shelves

Once you've chosen your wooden floating shelves, it's time to showcase their beauty with carefully curated displays. Here are some tips for styling them:

  • Create a Focal Point: Use a larger or more eye-catching item as a focal point, drawing attention to that area of the shelf.
  • Vary Height and Depth: Use different sizes and shapes of items to add visual interest and create a layered effect.
  • Incorporate Color and Texture: Combine items in various colors and textures to add depth and dimension to your display.
  • Group Similar Items: Group similar items together, like books, plants, or decorative objects, to create a cohesive and visually appealing arrangement.
  • Leave Some Space: Avoid overcrowding the shelves, leaving some empty space to create a sense of balance and allow the items to breathe.

Wooden floating shelves offer a beautiful and practical way to add both style and functionality to your home. By considering the factors outlined above and incorporating creative styling techniques, you can create stunning displays that showcase your personal style and enhance the ambiance of your living space.

Continue reading

Monday, November 18, 2024

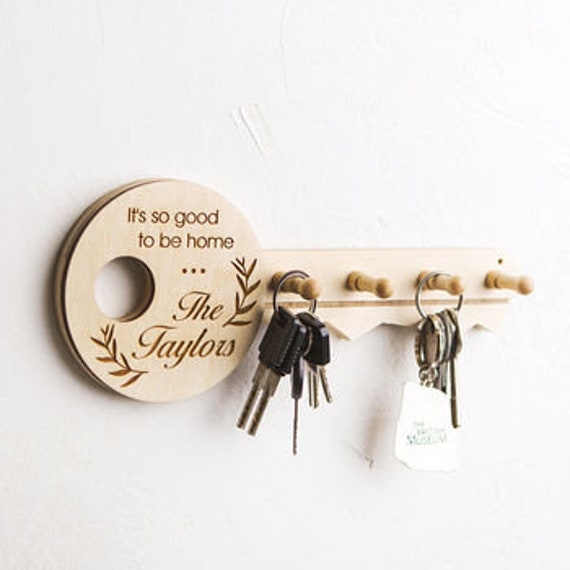
Wooden Key Racks with Storage for Mail and Other Essentials

Wooden Key Racks with Storage for Mail and Other Essentials

The Ultimate Guide to Wooden Key Racks with Storage: Keep Your Home Organized and Stylish

Let's face it, keys, mail, and those little "essentials" that seem to multiply like rabbits can quickly turn your entryway into a chaotic mess. But what if there was a way to keep all those things organized and within reach, while also adding a touch of warmth and style to your home? Enter the wonderful world of wooden key racks with storage!

These versatile pieces of furniture are more than just a place to hang your keys. They're a practical solution for managing clutter and adding a touch of natural elegance to your space. Whether you're looking for a compact solution for a small apartment or a grand statement piece for your foyer, there's a wooden key rack with storage out there for you.

The Benefits of Choosing a Wooden Key Rack with Storage

Beyond their obvious organizational benefits, wooden key racks with storage offer a plethora of advantages that make them a smart choice for your home:

Organization and Functionality

  • Centralized Hub: Wooden key racks with storage provide a designated spot for all your essentials, ensuring they're always easy to find.
  • Reduced Clutter: By consolidating items in one place, you eliminate the scattered mess that can quickly accumulate on countertops, tables, and entryway surfaces.
  • Enhanced Efficiency: With everything readily accessible, you save time and energy searching for your keys, mail, or other necessities.
  • Increased Space: By utilizing vertical space, these racks free up valuable surface area in your entryway.

Aesthetic Appeal

  • Natural Beauty: The warmth and texture of wood instantly elevate the look of any space, adding a touch of natural charm.
  • Versatile Styling: Wooden key racks come in various styles, from rustic farmhouse to modern minimalist, allowing you to find one that complements your home's aesthetic.
  • Personalized Touch: Choose a key rack with unique features like decorative carvings, metal accents, or engraved details to make it truly your own.

Durability and Longevity

  • High-Quality Materials: Well-crafted wooden key racks are built to last, withstanding daily wear and tear.
  • Timeless Design: Choose a classic design that won't go out of style, ensuring your key rack remains functional and fashionable for years to come.
  • Sustainable Choice: Opting for wood as a material contributes to sustainable practices and reduces your environmental footprint.

Types of Wooden Key Racks with Storage

The world of wooden key racks with storage is diverse and exciting, offering various styles and functionalities to meet your needs. Here's a breakdown of some popular types:

Wall-Mounted Key Racks

These are a great option for maximizing space in smaller entryways. Wall-mounted key racks often feature:

  • Hooks: For hanging keys, bags, and accessories.
  • Shelves: For storing mail, small items, or even decorative accents.
  • Drawers: For concealing items like charging cords, wallets, or spare change.

Free-Standing Key Racks

Perfect for those who prefer a more substantial piece of furniture, free-standing key racks offer greater storage capacity and a more prominent presence in the entryway.

  • Cabinets: With doors or open shelves, cabinets provide ample storage for larger items like hats, gloves, or even small packages.
  • Drawers: Often found on free-standing key racks, drawers offer a neat and tidy way to store smaller essentials.
  • Mail Sorter: Some free-standing key racks include integrated mail sorters, making it easy to organize incoming mail.

Corner Key Racks

Ideal for maximizing space in corners, corner key racks are compact and stylish, perfect for smaller spaces.

  • Compact Design: Designed to fit snugly in a corner, these racks minimize their footprint without compromising on functionality.
  • Multi-Tier Storage: Corner key racks often feature multiple tiers, offering ample storage for various items.
  • Space-Saving Solution: Perfect for entryways where space is limited, corner key racks are a clever and stylish way to organize your essentials.

Choosing the Perfect Wooden Key Rack with Storage

With so many options available, choosing the right wooden key rack with storage for your needs can feel overwhelming. But fear not! Here's a guide to help you make the best decision:

Consider Your Storage Needs

  • Think about what you need to store: Keys, mail, hats, gloves, charging cords, small packages?
  • Assess the size of your entryway: Do you have ample space or are you working with a limited area?

Style and Design

  • Choose a style that complements your home's decor: Rustic, modern, minimalist, farmhouse?
  • Consider the overall aesthetic of your entryway: Do you want a statement piece or something more subtle?

Material and Construction

  • Opt for high-quality wood: Look for durable and long-lasting materials like oak, walnut, or maple.
  • Inspect the craftsmanship: Ensure the key rack is well-built and free from defects.

Functionality and Features

  • Check for the features you need: Hooks, shelves, drawers, mail sorters?
  • Consider the ease of use: Is the key rack easy to access and use?

Tips for Styling Your Wooden Key Rack with Storage

Once you've selected your perfect wooden key rack with storage, it's time to style it to create a welcoming and organized entryway. Here are some tips:

  • Add a touch of greenery: Place a small potted plant or a vase with fresh flowers on a shelf or drawer to add a touch of nature.
  • Incorporate decorative accents: Use small decorative items like candles, picture frames, or sculptures to personalize your key rack.
  • Create a cohesive color palette: Use accessories in colors that complement the wood of your key rack and your entryway's overall decor.
  • Keep it clutter-free: Don't overcrowd your key rack with too many items. Maintain a balanced and organized look.

Frequently Asked Questions

What kind of wood is best for key racks?

Oak, walnut, and maple are popular choices for key racks due to their durability, beauty, and natural resistance to scratches and wear.

Can I find a wooden key rack with storage that fits my budget?

Absolutely! Wooden key racks with storage come in a wide range of prices, from budget-friendly options to more luxurious pieces. You can find a key rack that meets your needs and fits your budget.

Where can I find a wooden key rack with storage?

You can find wooden key racks with storage at various retailers, including home decor stores, furniture stores, and online marketplaces like Amazon and Etsy.

How do I clean my wooden key rack with storage?

Most wooden key racks can be cleaned with a damp cloth and mild soap. Avoid using harsh chemicals or abrasive cleaners that could damage the wood.

Ready to transform your entryway into a stylish and organized haven? Dive into the world of wooden key racks with storage and discover the perfect solution for your home! With their functionality, aesthetic appeal, and durability, these versatile pieces are an excellent investment in both practicality and beauty.

Continue reading

Wednesday, November 13, 2024

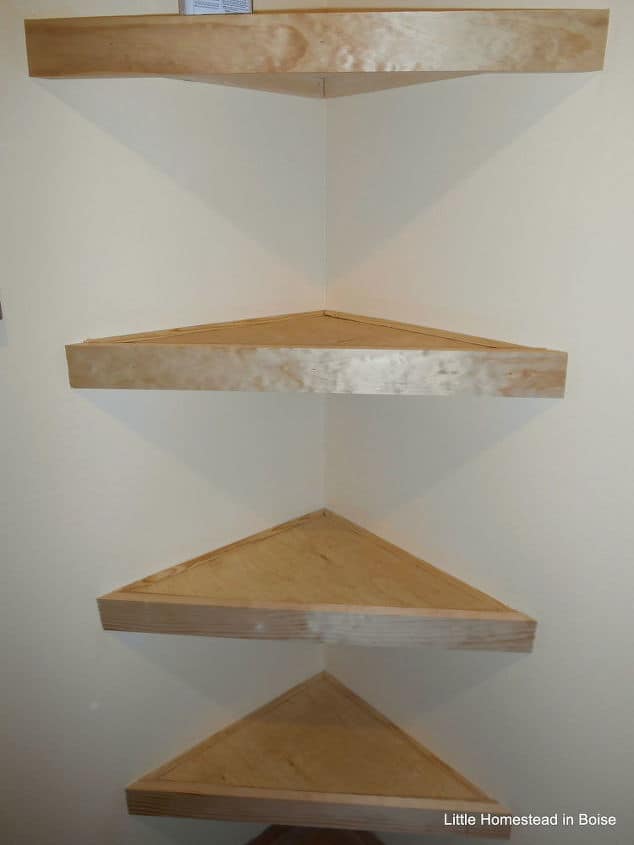
How to Build Wall Shelves for Corner Spaces to Save Space

How to Build Wall Shelves for Corner Spaces to Save Space

How to Build Wall Shelves for Corner Spaces to Save Space

Corner spaces in a room can often feel like wasted real estate. However, these often-overlooked areas can be transformed into valuable storage solutions with the addition of custom-built wall shelves. Corner shelves offer a unique opportunity to maximize space and add a touch of personality to your home decor.

Building wall shelves for corner spaces is a relatively straightforward DIY project that requires minimal tools and materials. This guide will provide you with a step-by-step process, from planning to installation, to help you successfully create functional and stylish shelves in your home.

Planning Your Corner Shelves

Before embarking on your shelving project, careful planning is essential to ensure a successful outcome. Consider the following factors:

1. Purpose and Use

Determine the primary purpose of the shelves. Will they be used for books, decorative items, or a combination of both? Knowing the intended use will influence your design decisions, such as the shelf depth and material choice.

2. Shelf Dimensions

Measure the corner space carefully to determine the maximum dimensions for your shelves. Consider the available wall space, the size of the corner, and the overall aesthetic of the room.

3. Shelf Number and Placement

Decide on the number of shelves you need and their placement within the corner. Factor in the height of your items and the desired visual impact. Creating shelves of different lengths can add visual interest and create a unique look.

4. Materials and Style

Choose the appropriate materials for your shelves based on their intended use and the style of your home. Popular choices include:

  • Wood: Durable, versatile, and available in various finishes.
  • Metal: Modern and industrial look, often used for open shelving.
  • Glass: Creates a minimalist and contemporary feel.
  • Acrylic: Lightweight and transparent, offering a modern and sleek appearance.

5. Shelf Brackets

Select sturdy shelf brackets that match the material and style of your shelves. Ensure that the brackets are rated for the weight you intend to place on the shelves. Options include:

  • Metal brackets: Offer a robust and durable solution.
  • Wood brackets: Provide a natural and rustic aesthetic.
  • Hidden brackets: Ideal for a clean and minimalist look.

Building Your Corner Shelves

Once you have a clear plan, it's time to gather the necessary tools and materials and start building your shelves.

1. Gather Tools and Materials

You'll need the following tools and materials for this project:

  • Saw: For cutting wood or other materials to size.
  • Drill: For drilling pilot holes and attaching brackets.
  • Screwdriver: For securing brackets and shelves.
  • Level: To ensure that shelves are straight and even.
  • Tape measure: For accurate measurements.
  • Pencil: For marking cutting lines.
  • Sandpaper: To smooth edges and prepare surfaces for finishing.
  • Wood glue: To enhance strength and durability.
  • Wood stain or paint (optional): For customizing the finish.
  • Shelves: Pre-cut or cut to size.
  • Brackets: Chosen based on your design.
  • Screws: For attaching brackets and shelves.
  • Wall anchors (optional): For securing brackets to drywall.

2. Cut and Prepare Shelf Material

If using pre-cut shelf material, skip this step. Otherwise, carefully measure and cut your shelves to the desired dimensions using a saw. Sand down all edges to create smooth and safe surfaces.

3. Install Shelf Brackets

Choose the location for your brackets. For corner shelves, you may need to install two brackets per shelf, one on each wall. Using a level, mark the bracket positions on the wall with a pencil.

If you are installing brackets into drywall, pre-drill pilot holes to prevent cracking. If the wall is solid, you may not need to drill pilot holes. Install the brackets using screws, ensuring they are securely attached to the wall. Make sure the brackets are level and properly positioned before attaching the shelves.

4. Attach Shelves

Carefully place the shelves onto the brackets, ensuring they are level and secure. If using wood shelves, consider adding a small amount of wood glue to the top of the brackets for extra strength. Secure the shelves to the brackets using screws, ensuring they are properly positioned and flush against the wall.

5. Finish and Decorate

Once the shelves are installed, you can add a final touch by staining or painting them to match your existing decor. Apply the finish evenly, and allow it to dry completely before placing any items on the shelves.

Tips for Successful Corner Shelf Construction

  • Measure twice, cut once: Accurate measurements are crucial for a successful project. Ensure all measurements are double-checked before making any cuts.
  • Use sturdy materials: Select strong and durable shelf materials and brackets to support the intended weight.
  • Consider weight distribution: Ensure the weight distribution is balanced on each shelf. Heavy items should be placed near the center to prevent shelves from sagging.
  • Use a level: A level is essential to ensure that your shelves are straight and even. Take the time to double-check and adjust the shelves until they are perfectly level.
  • Choose the right screws: Select screws that are long enough to penetrate the wall and secure the brackets properly. If attaching brackets to drywall, consider using wall anchors for extra support.
  • Safety first: Always wear safety glasses and gloves when using power tools. Be cautious when working with sharp tools and heavy objects.

Conclusion

By following this guide, you can build stylish and functional corner shelves to maximize your space and create a unique focal point in your home. The process is achievable for DIY enthusiasts of all skill levels and offers a rewarding way to enhance the look and functionality of any room.

Continue reading

Tuesday, November 12, 2024

Modern Coffee Table DIY Guide with Free PDF Plans

Modern Coffee Table DIY Guide with Free PDF Plans

Modern Coffee Table DIY Guide with Free PDF Plans

Tired of generic coffee tables that lack personality? Craft a statement piece for your living room with this DIY guide. You'll build a sleek, modern coffee table that perfectly complements your style. This guide provides easy-to-follow instructions, free downloadable PDF plans, and essential tips for a seamless building experience.

Materials You'll Need

Before you start, gather the necessary materials. This list assumes a standard coffee table size but can be adjusted for your needs. You can source these materials from your local hardware store or online retailers.

  • Wood planks: 1x12 pine (or any hardwood) - 4 pieces at 48" long
  • Plywood: 1/2" or 3/4" - one sheet (for the table top)
  • Wood glue: For secure joints
  • Wood screws: 2" and 1 1/2" lengths
  • Sandpaper: Assorted grits (80, 120, 220)
  • Wood stain or paint: Your preferred color
  • Finishing oil or polyurethane: For protection and sheen
  • Measuring tape: For accurate cutting
  • Saw: Miter saw, circular saw, or jigsaw
  • Drill: With drill bits and screwdriver attachments
  • Clamps: To hold pieces together during assembly
  • Safety glasses: Protect your eyes during cutting and sanding

Step-by-Step Guide

Let's get building! Follow these steps for a successful coffee table build.

1. Cut the Wood Pieces

Start by cutting the wood planks to the correct sizes. You'll need four legs, two long side rails, and two shorter end rails. The free PDF plans provide exact measurements. Use a miter saw or circular saw for precise cuts. Remember to wear safety glasses.

2. Assemble the Legs

Create the table's base by assembling the legs. Apply wood glue to the ends of two legs and join them to a side rail. Secure with screws. Repeat this step for the other side. Once both sides are assembled, attach the end rails to form a rectangular frame. Ensure the frame is square and secure before moving on.

3. Cut and Prepare the Table Top

Measure the inside of the table frame to determine the dimensions of the tabletop. Cut the plywood to these dimensions. Use a jigsaw for precise cuts. After cutting, sand the edges to create a smooth surface. If desired, you can use a router to round the edges for a softer aesthetic.

4. Attach the Table Top

Position the tabletop on top of the frame. Ensure it's centered and level. Using wood glue and screws, attach the tabletop to the frame. Make sure the screws are countersunk and the screw holes are filled with wood filler for a seamless appearance.

5. Finishing Touches

Your coffee table is almost complete! Now, apply the finishing touches. Sand the entire table, starting with coarser grits and gradually moving to finer grits for a smooth surface. This will help to remove any imperfections and prepare the table for staining or painting.

6. Stain or Paint

Apply your chosen stain or paint. Be sure to follow the manufacturer's instructions for application and drying time. For a modern look, consider using a rich walnut stain or a sleek matte black paint. You can also choose a bold accent color for a pop of personality.

7. Apply Finishing Oil or Polyurethane

After staining or painting, apply a finishing oil or polyurethane to protect the wood and enhance its beauty. This layer will create a durable surface and prevent water damage. Multiple coats are recommended for maximum protection. Allow each coat to dry thoroughly before applying the next.

Download Your Free PDF Plans

Ready to start building your modern coffee table? Download our free PDF plans for detailed dimensions and assembly instructions.

Download PDF Plans: [Link to PDF file]

Tips for Success

  • Use clamps to hold pieces together securely during assembly.
  • Pre-drill pilot holes for screws to prevent wood splitting.
  • Sand thoroughly to create a smooth surface for staining or painting.
  • Allow ample drying time between coats of finish.
  • Don't be afraid to personalize your coffee table with unique touches like metal accents, decorative hardware, or a custom tabletop design.

Conclusion

With these instructions and your creative vision, you can build a stunning modern coffee table that becomes a conversation starter in your home. Enjoy the satisfaction of crafting a piece that reflects your style and complements your living space.

Continue reading

Build a Stylish Coffee Table: Free PDF Plans Inside

Build a Stylish Coffee Table: Free PDF Plans Inside

Build a Stylish Coffee Table: Free PDF Plans Inside

Are you looking to add a touch of elegance and functionality to your living room? Building your own coffee table is a rewarding project that allows you to express your creativity and design a piece that perfectly complements your space. This comprehensive guide will walk you through the process of creating a stylish coffee table from scratch, complete with free downloadable PDF plans to guide you every step of the way.

Choosing Your Style and Materials

The first step is to envision the style and materials that will best suit your home. Do you prefer a sleek and modern design, a rustic farmhouse aesthetic, or something in between? Consider the overall style of your living room and choose a coffee table that harmonizes with the existing furniture.

Popular Coffee Table Styles

  • Modern: Clean lines, geometric shapes, and minimalist designs. Often constructed from materials like metal, glass, or acrylic.
  • Industrial: Raw materials like reclaimed wood, metal piping, and exposed hardware create a rugged and edgy look.
  • Rustic: Natural wood finishes, distressed surfaces, and farmhouse-inspired details give a warm and inviting feel.
  • Mid-Century Modern: A blend of modern and retro elements, with iconic designs featuring tapered legs, curved shapes, and warm wood tones.

Once you've chosen your style, consider the materials you'll use for construction. Popular options include:

  • Wood: Durable, versatile, and available in a wide range of species and finishes.
  • Metal: Adds a contemporary touch and can be used for legs, frames, or accents.
  • Glass: Creates a sleek and modern look, but requires careful handling and cleaning.

Gathering Tools and Materials

To build your coffee table, you'll need a few basic tools and materials. The specific tools and materials will vary depending on the design and construction method, but here's a general list:

  • Power drill: For drilling pilot holes and attaching hardware.
  • Saw: For cutting wood or other materials.
  • Measuring tape: To ensure accurate dimensions.
  • Clamps: To hold pieces together while gluing or assembling.
  • Sandpaper: For smoothing surfaces and creating a fine finish.
  • Wood glue: To bond wood components.
  • Screws: To secure wood pieces together.
  • Finish: Paint, stain, or sealant to protect and enhance the appearance of the wood.

Free PDF Plans: Your Step-by-Step Guide

To make the coffee table building process as smooth as possible, we've created a set of free PDF plans specifically designed to guide you through each step. These plans include detailed instructions, diagrams, and cutting lists, ensuring you have everything you need to create your dream coffee table.

Download your free PDF plans here! (Insert link to PDF download page)

Building Your Coffee Table: Step-by-Step Instructions

The specific building steps will vary depending on the chosen design, but the general process involves:

  • Cutting the materials: Using your saw, accurately cut the wood or other materials to the dimensions specified in the plans.
  • Assembling the frame: Join the wood pieces using wood glue and screws to create the frame of your coffee table.
  • Attaching legs or base: Securely attach the legs or base to the frame.
  • Adding details: Depending on your design, you may add shelves, drawers, or other features.
  • Sanding and finishing: Carefully sand all surfaces smooth and apply your chosen finish to protect and enhance the appearance.

Finishing Touches: Personalize Your Coffee Table

Once your coffee table is built, you can add a personal touch with finishing details. Consider these ideas:

  • Unique hardware: Choose stylish drawer pulls or knobs to enhance the design.
  • Decorative accents: Add a decorative trim, molding, or inlay for a personalized touch.
  • Custom finish: Experiment with different paint colors, stains, or distressing techniques to create a one-of-a-kind look.

Enjoy Your New Coffee Table

Congratulations! You've now successfully built a stylish and functional coffee table that will be the centerpiece of your living room. Take pride in your creation and enjoy the satisfaction of having designed and built your own piece of furniture.

Continue reading

Rustic DIY Firewood Rack Plans Using Wooden Pallets

Rustic DIY Firewood Rack Plans Using Wooden Pallets

Rustic DIY Firewood Rack Plans Using Wooden Pallets

Transforming ordinary wooden pallets into a stylish and functional firewood rack is a fantastic way to add rustic charm to your outdoor space while maximizing storage efficiency. This DIY project is surprisingly simple, even for beginners, and requires minimal tools and materials. With a few hours of your time and some basic woodworking skills, you can create a unique firewood rack that complements your garden or patio perfectly.

Gather Your Supplies

Before you begin, make sure you have the following materials and tools ready:

  • One or two wooden pallets: Choose pallets that are sturdy and free from damage.
  • Safety glasses: Protect your eyes while working with wood.
  • Gloves: Keep your hands safe from splinters and rough surfaces.
  • Circular saw or handsaw: For cutting the pallet to your desired size.
  • Hammer: For securing the pallet pieces together.
  • Screwdriver: For attaching any additional hardware.
  • Screws or nails: For securing the pallet pieces.
  • Wood stain or paint (optional): For adding a finishing touch and protection.
  • Sandpaper (optional): For smoothing the surface of the pallet.

Building Your Firewood Rack

Step 1: Prepare the Pallet

Start by cleaning the pallet thoroughly to remove any debris or dirt. If you are using a pallet that has been treated with chemicals, make sure to check with the manufacturer about safety measures before using it. Remove any loose boards or nails that could pose a hazard.

Step 2: Cut the Pallet (Optional)

If your pallet is too large, carefully cut it to your desired size using a circular saw or handsaw. Make sure to wear safety glasses and gloves for this step.

Step 3: Assemble the Rack

There are several ways to assemble your firewood rack. You can simply use the existing structure of the pallet as a base and add additional support beams for stability. Alternatively, you can disassemble the pallet and create a more customized design by joining the boards together in a different configuration. If you are creating a freestanding rack, you will need to secure the base to the ground using stakes or anchors.

Step 4: Add Finishing Touches

Once your rack is assembled, you can sand down any rough edges and apply a wood stain or paint for a polished look. If you choose to stain the wood, make sure to use a sealant to protect it from the elements. You can also personalize your rack by adding decorative accents like metal hooks, handles, or wheels for easy mobility.

Tips for Success

Here are some additional tips to help you create a successful firewood rack:

  • Consider the size of your firewood and choose a pallet that is large enough to accommodate it.
  • Position your rack in a dry and well-ventilated location to prevent mildew growth.
  • Ensure the rack is stable and secured to prevent it from tipping over.
  • Don’t overload the rack to avoid putting too much stress on the structure.
  • Let your creativity flow and don’t be afraid to experiment with different designs and materials.

Conclusion

Creating a DIY firewood rack using wooden pallets is a rewarding and practical project that adds a rustic touch to your outdoor space. With a little effort and creativity, you can transform discarded pallets into a functional and aesthetically pleasing storage solution for your firewood. So, gather your materials and start building your own custom-made rack today!

Continue reading

DIY Pallet Firewood Rack: How to Build a Rack with Minimal Tools

DIY Pallet Firewood Rack: How to Build a Rack with Minimal Tools

DIY Pallet Firewood Rack: A Minimal Tool Approach

Seeking a practical and stylish solution to store your firewood? Look no further than repurposed pallets. This readily available material offers a sustainable and economical foundation for building a sturdy firewood rack. The beauty of this project lies in its simplicity â€" you can achieve remarkable results with minimal tools and effort. This comprehensive guide will equip you with the knowledge and steps to construct a DIY pallet firewood rack that seamlessly blends functionality with aesthetics.

Choosing the Right Pallet

The first step in your DIY journey is to select the ideal pallet. While any pallet will work, some are better suited for firewood racks than others.

Types of Pallets

  • Stringer Pallets: These feature horizontal stringers connecting the top and bottom boards, offering excellent stability for the rack. They typically have 3-4 stringers, providing ample support for stacked wood.
  • Block Pallets: This type features blocks instead of stringers for support. While they are less common, they can still be suitable for firewood racks, especially if they have a sturdy construction.
  • European Pallets: Smaller than standard pallets, these are ideal for smaller spaces or for storing lighter woods.

Assessing Pallet Condition

Inspect the pallet thoroughly before using it. Ensure it's in good condition, free of loose nails, splinters, or major damage. Any significant structural issues could compromise the stability of your firewood rack.

Gathering Essential Tools

While a comprehensive toolset can enhance the project, building a basic pallet firewood rack requires only a few essential tools:

  • Hammer: For securing nails and removing loose ones.
  • Measuring Tape: To accurately measure and mark the pallet for cutting.
  • Circular Saw or Handsaw: To cut the pallet to your desired dimensions.
  • Safety Glasses: Always wear safety glasses when working with power tools or making cuts.
  • Work Gloves: Protect your hands from splinters and potential injuries.

Building the Firewood Rack

Now, let's move on to the construction process. This step-by-step guide will help you create a functional and aesthetically pleasing firewood rack:

Step 1: Prepare the Pallet

  • Clean the pallet thoroughly: Remove any dirt, debris, or loose materials.
  • Sand the pallet: This creates a smoother surface and prevents splinters. Use a coarse-grit sandpaper for rough spots and a fine-grit sandpaper for a smooth finish.
  • Paint or stain (optional): Personalize your firewood rack by applying a protective layer of paint or stain. This adds durability and enhances the visual appeal.

Step 2: Measure and Cut (if necessary)

If the pallet is too long or wide for your space, cut it to size. Measure and mark the pallet carefully using your measuring tape. Use your circular saw or handsaw to make the cuts. Make sure to cut straight and cleanly to ensure stability.

Step 3: Assemble the Rack

  • Horizontal Rack: For a traditional firewood rack, place the pallet horizontally on the ground. You can use additional pallet boards or lumber to create a base if needed.
  • Vertical Rack: For a space-saving option, arrange the pallet vertically against a wall. Ensure the pallet is securely supported. You may need to attach the pallet to the wall for extra stability.
  • Lean-To Rack: For a simple and compact solution, use a single pallet to create a lean-to rack. Lean it against a wall or stable structure, ensuring it is secured for stability.

Step 4: Customize and Personalize

Once your rack is assembled, you can personalize it further. Here are some ideas:

  • Add decorative touches: Enhance the rack with decorative hardware, rope, or stencils to enhance its visual appeal.
  • Incorporate additional storage: Use leftover pallet boards to create shelves for storing kindling, fire starters, or other fireplace essentials.
  • Use a pallet for the base: If building a horizontal rack, use a second pallet as a base for a more robust design.

Safety Considerations

Safety is paramount when working with tools and wood. Always prioritize safety by adhering to these precautions:

  • Wear safety glasses and gloves: Protect your eyes and hands from potential hazards.
  • Be cautious with power tools: Use power tools with caution and follow all manufacturer instructions. Ensure the tools are sharp and in good working condition.
  • Handle wood with care: Beware of splinters and potential cuts. Sand rough edges to minimize the risk of injury.
  • Choose a safe work area: Work in a well-lit, clear space to prevent tripping and ensure stability.

Tips for a Successful Pallet Firewood Rack

Here are some additional tips to make your project a success:

  • Consider your space: Before choosing a design, think about the available space and how it will fit in your outdoor area.
  • Select the right type of wood: If using additional wood for shelves or supports, choose sturdy and weather-resistant options like cedar or redwood.
  • Treat the wood (optional): Applying a sealant or weatherproofing treatment can extend the life of your rack and protect it from the elements.
  • Secure the rack: Make sure the rack is securely attached to the ground, a wall, or a stable structure, especially if you're using a vertical or lean-to design.

Conclusion

Building a DIY pallet firewood rack is a rewarding project that combines practicality with sustainability. With minimal tools and a few hours of your time, you can create a custom storage solution that enhances your outdoor space and adds a rustic charm to your home. This guide has provided the necessary knowledge and steps to build a functional and aesthetically pleasing firewood rack, allowing you to enjoy the warmth of a fire without compromising on style or environmental responsibility.

Continue reading

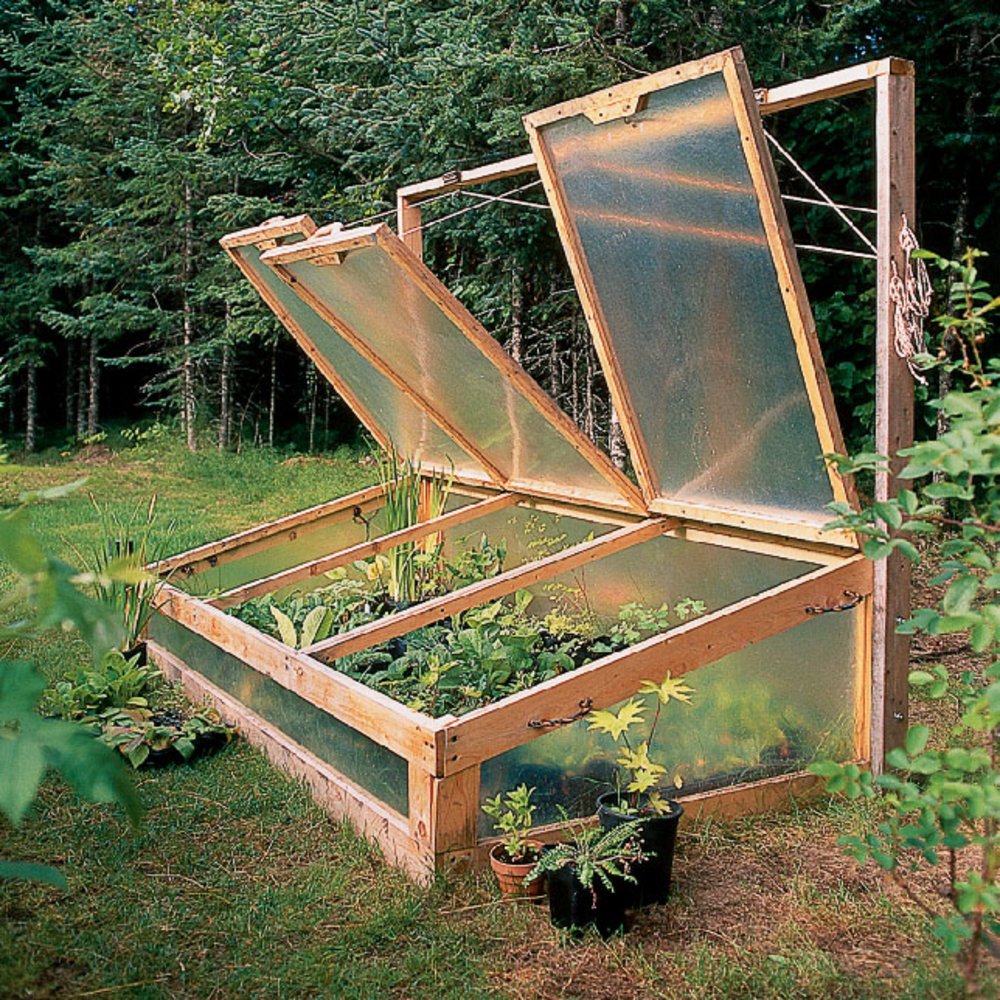
How to Make a Cold Frame from Reclaimed Wood

How to Make a Cold Frame from Reclaimed Wood

Creating a Cold Frame from Reclaimed Wood: A Step-by-Step Guide

Embrace the beauty and sustainability of reclaimed wood while boosting your gardening endeavors with a cold frame. This DIY project not only adds a touch of rustic charm to your yard but also provides a haven for your seedlings to thrive during colder months. Let's embark on this rewarding journey together!

Gathering Your Materials and Tools

Before you begin, gather the necessary materials and tools to ensure a smooth construction process. You'll need:

  • Reclaimed wood boards (for the frame and lid)
  • Hinges (for the lid)
  • Screws or nails (for assembly)
  • Glass or polycarbonate sheets (for the lid)
  • Silicone sealant
  • Measuring tape
  • Saw (circular or hand saw)
  • Drill (with appropriate bits)
  • Level
  • Safety glasses
  • Gloves

Crafting the Cold Frame's Foundation

Defining the Dimensions

Decide on the dimensions of your cold frame, considering the size of your seedlings and the space available in your garden. A standard size is approximately 3 feet wide, 4 feet long, and 2 feet tall. Measure and cut the reclaimed wood boards to these dimensions using your saw.

Building the Frame

Using screws or nails, connect the wood boards to form a rectangular frame. Ensure that the corners are square and secure. If needed, use clamps to hold the pieces together while securing them. Position the frame on a level spot in your garden where it will receive adequate sunlight.

Constructing the Lid

Creating the Lid Frame

Repeat the process from the previous step to create a frame for the lid. This frame should be slightly smaller than the base frame to allow for a snug fit and easy opening and closing.

Attaching the Covering

Cut your glass or polycarbonate sheets to match the dimensions of the lid frame. Use silicone sealant to adhere the covering material to the lid frame, creating a waterproof seal. Allow the sealant to dry completely before proceeding.

Finishing Touches: Assembling and Securing the Lid

Attach the hinges to the lid frame and the base frame, ensuring smooth movement. You can choose from various types of hinges depending on your preference and design. Adjust the hinges for optimal opening and closing. Optional: If needed, add a handle to the lid for easy access.

Prepare Your Cold Frame for Planting

Fill the cold frame with a suitable potting mix or garden soil. Ensure proper drainage by adding a layer of gravel or rocks at the bottom. Plant your seedlings, leaving ample space for them to grow. Carefully close the lid and monitor your plants for their progress.

Enjoying the Rewards of Your Labor

Your cold frame, crafted from reclaimed wood, now provides a protected environment for your seedlings to flourish. Enjoy the satisfaction of your DIY project and marvel at the growth of your plants as you nurture them through the colder months.

Continue reading

Crafting a Squirrel Den Box: Simple DIY Steps

Crafting a Squirrel Den Box: Simple DIY Steps

Crafting a Squirrel Den Box: Simple DIY Steps

Welcome to the world of backyard wildlife havens! Today, we're building a cozy squirrel den box. This simple project is perfect for adding a touch of nature's charm to your yard while providing a safe and comfortable shelter for these adorable creatures. Let's get started!

Materials You'll Need

Before you begin, gather the necessary materials to create a squirrel haven:

  • One piece of 1x8-inch lumber, approximately 16 inches long
  • One piece of 1x6-inch lumber, approximately 16 inches long
  • One piece of 1x4-inch lumber, approximately 12 inches long
  • One piece of 1x4-inch lumber, approximately 10 inches long
  • Wood screws (at least 1 1/2 inch long)
  • Wood glue
  • A drill and drill bits
  • Measuring tape
  • Pencil
  • Saw (hand saw, circular saw, or jigsaw)
  • Sandpaper

Step-by-Step Construction

Now that you have your materials, let's build the den box. This step-by-step guide will walk you through the process:

1. Cut the Lumber

Start by cutting the lumber to the following dimensions:

  • Bottom: Cut the 1x8-inch piece to 16 inches long. This will form the bottom of the den box.
  • Front Panel: Cut the 1x6-inch piece to 16 inches long. This will be the front of the den box.
  • Side Panels: Cut two pieces of the 1x4-inch lumber to 12 inches long. These will be the side panels.
  • Back Panel: Cut the 1x4-inch piece to 10 inches long. This will be the back of the den box.

2. Assemble the Box

Let's put the pieces together. - Position the bottom piece on a flat surface. - Securely attach the side panels to the bottom piece using wood screws and wood glue. Make sure they are flush with the bottom. - Attach the front panel to the bottom and side panels, ensuring it's flush with the sides. - Finally, attach the back panel to the bottom, side panels, and front panel, completing the box.

3. Add Ventilation

Ventilation is key to keeping the den box dry and healthy. To create air circulation, drill 1/4-inch diameter holes on the sides of the box. You can make 3-4 holes per side.

4. Finishing Touches

Here are a few finishing touches that add a nice final touch to your squirrel den box:

  • Sand the box: Smooth any rough edges with sandpaper to create a safe environment for the squirrels.
  • Optional: Staining or Painting: For a more natural look, you can stain the wood. For a playful touch, consider painting the den box in bright and cheerful colors. Remember to use non-toxic paints if you plan to paint.

Installation and Placement

Now, let's set up your new squirrel den box:

  • Choose a location: Select a spot in your yard that provides protection from the elements. The den box should be placed at least 6 feet off the ground. This helps the squirrels feel secure and protects them from predators.
  • Secure the den box: Attach the den box to a sturdy tree branch or a post with heavy-duty wire or a sturdy bracket. Ensure it's firmly secured to prevent it from falling.

Enjoy Your New Squirrel Haven

Congratulations! You've successfully created a welcoming den box for your backyard squirrels. Now you can sit back and enjoy the sights and sounds of these playful creatures. As they settle into their new home, you'll be creating a valuable habitat for these charming creatures.

Continue reading

How to build a corner desk from wood for small rooms

How to build a corner desk from wood for small rooms

Building a Corner Desk from Wood for Small Rooms

In the realm of interior design, maximizing space is paramount, particularly in compact living spaces. A corner desk emerges as an ingenious solution, seamlessly integrating functionality and aesthetics. This comprehensive guide will delve into the art of crafting a bespoke corner desk from wood, tailored to the unique dimensions of small rooms.

Planning and Design

Before embarking on the construction process, meticulous planning is essential to ensure a successful outcome.

1. Define the Corner and Space

Identify the corner where the desk will reside and measure the available space accurately. Consider the dimensions of the room, existing furniture, and the desired size and shape of the desk. Draw a rough sketch of the planned desk, incorporating the corner location.

2. Determine the Desk's Dimensions

Decide on the desired length, width, and height of the desk. Consider the intended use and personal preferences. A typical desk height ranges from 28 to 30 inches, while the length and width depend on the available space and the required workspace.

3. Select the Wood Type

The choice of wood influences both the appearance and durability of the desk. Consider the following factors:

  • Appearance: The grain patterns, color, and texture of different wood species can significantly impact the desk's aesthetic.
  • Durability: Some woods are naturally resistant to scratches, dents, and moisture, making them suitable for high-traffic areas. Hardwoods like oak, maple, and cherry are generally durable choices.
  • Cost: The price of wood varies depending on the species, quality, and availability.

4. Decide on the Desk's Style

Explore different desk styles, such as traditional, contemporary, or rustic. Consider the existing decor of the room and the overall desired aesthetic. Draw inspiration from online sources or magazines to visualize different options.

Materials and Tools

Gathering the necessary materials and tools is crucial for a smooth construction process.

1. Materials

  • Wood: Choose the desired wood species based on the design and budget. Determine the thickness and dimensions of the boards required for the desk top, legs, and supporting structures.
  • Wood glue: Use a high-quality wood glue designed for strong bonding.
  • Screws: Select screws of appropriate length and diameter for securing the desk components.
  • Wood filler: Fill any gaps or imperfections in the wood surface with wood filler.
  • Sandpaper: Use sandpaper of various grits to smooth the wood surfaces and prepare them for finishing.
  • Stain: If desired, use a wood stain to enhance the color and grain patterns of the wood.
  • Polyurethane finish: Protect the desk from water damage and wear and tear with a polyurethane finish.

2. Tools

  • Miter saw: Cut the wood pieces at precise angles with a miter saw.
  • Circular saw: Cut straight lines in the wood with a circular saw.
  • Drill: Create pilot holes for screws and use a drill bit appropriate for the screw size.
  • Screwdriver: Secure the desk components with a screwdriver.
  • Clamps: Hold the wood pieces together while applying glue and screws.
  • Measuring tape: Measure the wood pieces accurately for precise cuts.
  • Pencil: Mark the wood pieces for cutting and drilling.

Construction Steps

Now, let's proceed with the step-by-step construction process:

1. Cut the Wood Pieces

Using the plans and measured dimensions, cut the wood pieces for the desk top, legs, and supporting structures. Employ a miter saw or circular saw to ensure accurate and precise cuts. Cut the pieces slightly larger than the final dimensions to allow for sanding and fitting.

2. Assemble the Desk Top

If the desk top requires multiple pieces of wood, join them together using wood glue and screws. Apply wood glue to the edges of the wood pieces and clamp them tightly together for several hours to allow the glue to dry completely. Sand the edges of the desk top smooth.

3. Construct the Legs

Cut the leg pieces to the desired height and attach them to the desk top. Use screws or bolts to secure the legs to the underside of the desk top. If desired, add decorative details to the legs, such as molding or carvings.

4. Build the Supporting Structure

If needed, construct a supporting structure to provide stability and support for the desk top. This structure can be made of additional wood pieces, such as rails, beams, or shelves. Attach the supporting structure to the desk top and legs using wood glue and screws.

5. Sand and Finish

Sand the entire desk surface smoothly with sandpaper of varying grits. Start with a coarse grit to remove any rough edges and progress to a fine grit for a smooth finish. Apply wood filler to any gaps or imperfections in the wood surface and allow it to dry completely. Sand the filled areas smooth.

6. Stain and Seal

If desired, stain the desk with a wood stain to enhance the color and grain patterns. Apply the stain evenly to the entire surface and allow it to dry completely. Seal the desk with a polyurethane finish to protect it from water damage and wear and tear. Apply the polyurethane in thin coats and allow each coat to dry completely before applying the next coat.

Final Touches and Installation

Once the desk is built and finished, add the final touches and install it in its designated corner.

1. Add Hardware

Install any necessary hardware, such as drawer slides, hinges, or knobs. Ensure that the hardware is properly secured and functions smoothly.

2. Position the Desk

Carefully position the desk in the chosen corner of the room. Ensure that it is level and stable before using it.

3. Enjoy Your New Corner Desk

Your handcrafted corner desk is now ready to enhance your workspace and add style to your small room. Enjoy the satisfaction of creating a bespoke piece of furniture that perfectly complements your needs and aesthetic preferences.

Continue reading

Diy magic box: ready to start your woodworking project?

Diy magic box: ready to start your woodworking project?

DIY Magic Box: Ready to Start Your Woodworking Project?

Hey there, woodworkers! Are you looking for a fun and rewarding project that'll leave your friends and family amazed? Well, get ready to unleash your inner magician because we're about to dive into the world of DIY magic boxes. These enchanting little contraptions are more than just boxes; they're a testament to your creativity and woodworking skills, and they'll have everyone wondering how you pulled off those tricks.

But before we get into the nitty-gritty details, let's talk about what makes a magic box so special. It's not just about the box itself, but about the illusions it creates. Imagine this: you place an object inside the box, close the lid, and then â€" poof! â€" it disappears, reappears in a different spot, or even transforms into something else! That's the power of a magic box, and it's something you can achieve with a little bit of woodworking know-how and a sprinkle of imagination.

The Magic Box: A World of Possibilities

The beauty of DIY magic boxes lies in their versatility. You can build them in all shapes and sizes, and customize them with your own unique design elements. Need a box for a specific trick? No problem! Want to add hidden compartments and secret mechanisms? You got it! The possibilities are truly endless, limited only by your creativity.

And here's the best part: you don't need to be a seasoned woodworker to create your own magic box. Even beginners can jump in and enjoy the process. We'll guide you through every step, from selecting the right materials to assembling the box and adding those magic-making touches.

Step One: Gathering Your Supplies

First things first, you need to gather your materials. Here's a list of essential items you'll need:

  • Wood: Choose a wood that's easy to work with and has a nice finish. Some popular options include pine, plywood, or MDF.
  • Tools: You'll need a saw, a drill, sandpaper, a ruler, a pencil, and wood glue. If you're feeling fancy, you can also get a router and some woodworking clamps.
  • Hardware: Depending on your design, you might need hinges, latches, magnets, or even a small motor.
  • Finishing supplies: Paint, stain, varnish, or a clear sealant will help protect your box and add a touch of style.

Now, you might be thinking, "But I don't have all these fancy tools!" Don't worry, you can always borrow or rent them from a local hardware store or woodworking shop. You could even find some of these tools second-hand online or at flea markets. Just make sure they're in good condition before you start working.

Step Two: Designing Your Magic Box

The next step is to design your magic box. Here's where your imagination really comes into play! Think about the type of tricks you want to perform, the size and shape of the box, and any special features you want to include.

Here are some ideas to get you started:

  • Classic disappearing act: A simple box with a sliding panel or a hinged bottom can be used to make objects disappear.
  • The "multiplying" box: Design a box with a secret compartment that allows you to reveal multiple objects.
  • The "transforming" box: Add a hidden mechanism that allows you to switch objects inside the box without anyone noticing.
  • The "floating" box: Create a box that appears to float in mid-air. This one might require some advanced techniques, but the effect is truly mind-blowing!

Drawing Your Plans

Once you've got a general idea of what you want to build, it's time to draw up your plans. This will help you visualize the final product and make sure all the pieces fit together perfectly.

Use a pencil and ruler to sketch out your box on paper. Include measurements for each piece, and label them clearly. You can even use a software program like SketchUp or AutoCAD for more detailed plans.

Step Three: Building the Box

Now comes the fun part: putting your plans into action! Start by cutting out the pieces of wood according to your measurements. Use a saw, a jigsaw, or a router, depending on the size and complexity of your design.

Next, assemble the pieces of wood using wood glue and screws. If you're working with a complex design, it's a good idea to use clamps to hold the pieces together while the glue dries.

Once the glue is dry, you can start adding the finishing touches, like hinges, latches, magnets, or any other hardware you need.

Step Four: Incorporating the Magic

This is where your illusion skills come into play. Add hidden compartments, secret mechanisms, or other surprises to your box. Think about the specific tricks you want to perform and how you can use the box to achieve them.

Here are a few ideas:

  • Sliding panel: A simple sliding panel can be used to hide or reveal objects.
  • Hinged bottom: A hinged bottom can be used to drop an object into a hidden compartment.
  • Secret compartment: A secret compartment can be used to hide objects or reveal them at a later time.
  • Small motor: A small motor can be used to create movement or rotation inside the box.

The key to a successful magic box is creating a seamless illusion. Practice your trick beforehand to ensure everything works smoothly.

Step Five: Finishing Touches

Now it's time to give your magic box a polished look! Sand down any rough edges and apply a finish, like paint, stain, or varnish. You can also add decorative elements, like stencils, decals, or engravings, to make your box truly unique.

Once the finish is dry, you can start practicing your tricks! Show off your woodworking skills and amaze your friends and family with your very own magical creations.

A Word of Encouragement

Remember, creating a magic box is a journey, not a race. Don't be afraid to experiment, make mistakes, and have fun along the way. Every project, no matter how big or small, is a chance to learn and grow as a woodworker. And who knows, you might even discover a hidden talent for illusion!

So grab your tools, get creative, and let's build some magic together. The world is waiting to be amazed!

Continue reading

Building a Squirrel Box: Plans for Success

Building a Squirrel Box: Plans for Success

Building a Squirrel Box: Plans for Success

Hey there, nature lovers! Are you tired of those pesky squirrels raiding your bird feeders? Well, you're not alone. But instead of trying to chase them away, why not give them their own little haven? Building a squirrel box is a fun and rewarding project, and you'll be amazed at how much joy it brings to your backyard. Plus, it's a great way to help these cute critters thrive.

So, grab your tools and let's get started on building the ultimate squirrel box! We'll cover everything you need to know, from choosing the right materials to designing a squirrel-friendly space.

Choosing the Right Materials

First things first, you'll need to select some sturdy materials for your squirrel box. Think about how long you want it to last and how weather-resistant it needs to be. Here's a breakdown of some popular choices:

Wood

Wood is a classic choice for building squirrel boxes. It's readily available, relatively inexpensive, and easy to work with.

  • Cedar is a great option because it's naturally resistant to rot and insects. Plus, it has a pleasant aroma that squirrels seem to love.
  • Redwood is another durable choice that's naturally resistant to weathering. It's a bit more expensive than cedar, but it will last for years.
  • Pine is a softer wood that's easier to work with but might not be as long-lasting as cedar or redwood. It's a good choice for budget-conscious builders.

Metal

Metal is another excellent choice for building a durable squirrel box. It's weather-resistant, long-lasting, and can be easily cleaned.

  • Galvanized steel is a popular choice for its strength and durability.
  • Aluminum is a lightweight metal that's also very durable and weather-resistant.

Plastic

Plastic is a less common option for squirrel boxes, but it can be a good choice for its affordability and ease of cleaning. However, plastic isn't as durable as wood or metal, so it might not last as long.

Designing a Squirrel-Friendly Box

Now that you've chosen your materials, it's time to start designing your squirrel box. Consider the following factors:

Size and Shape

The ideal size for a squirrel box is about 12 inches wide, 12 inches deep, and 18 inches tall. Make sure the entrance hole is large enough for squirrels to easily enter and exit. A 3-inch diameter hole is a good starting point.

The shape of your squirrel box can be as simple or as elaborate as you like. You can opt for a classic rectangular box or get creative with different shapes.

Placement

Where you place your squirrel box will affect its popularity. Squirrels prefer to build their nests in trees, so consider placing your box on a tree trunk or a sturdy post. Make sure the box is at least 6 feet off the ground to keep it safe from predators and curious humans.

Choose a location that provides some shade from the sun and rain. Squirrels are more likely to choose a box that offers some shelter from the elements.

Features

Consider adding some extra features to make your squirrel box even more appealing to its furry residents.

  • A roof overhang will help protect the entrance hole from rain and snow.
  • A nesting platform gives the squirrels a place to rest and watch their surroundings.
  • A drainage hole in the bottom of the box prevents water from pooling inside.

Building Your Squirrel Box

Once you have your materials and a design in mind, you're ready to start building your squirrel box.

Tools

You'll need some basic tools for this project, including:

  • Saw
  • Hammer
  • Screwdriver
  • Drill
  • Tape measure
  • Level

Instructions

Here's a step-by-step guide to building your squirrel box:

  1. Cut the wood or metal to size. You'll need four pieces for the sides, one for the bottom, and one for the roof.
  2. Assemble the box. Using screws or nails, attach the four sides to the bottom piece.
  3. Cut the entrance hole. Use a drill bit or saw to make a 3-inch diameter hole in one of the sides.
  4. Attach the roof. Secure the roof to the top of the box, making sure it overlaps the sides to protect the interior from rain.
  5. Add any desired features. If you're adding a nesting platform, a roof overhang, or a drainage hole, do so now.
  6. Sand and stain or paint. If you're using wood, sand the box smooth and apply a stain or paint to protect it from the elements. You can use natural-toned stain or paint to blend the box into its surroundings.
  7. Place the box. Find a suitable location for your squirrel box and attach it securely to a tree trunk or a post.
  8. Tips for Attracting Squirrels

    You've built the perfect squirrel box, now it's time to attract those furry residents. Here are some tips to make your box irresistible:

    • Choose a secluded spot. Squirrels prefer to build their nests in areas that offer some privacy and protection from predators.
    • Provide a food source. Squirrels love nuts, seeds, and fruits. Place a feeder near the box or scatter some food on the ground.
    • Be patient. It might take some time for squirrels to discover your new box. Just be patient and keep providing food and shelter.

    Enjoy Your New Squirrel Neighbors

    Congratulations! You've now created a welcoming home for squirrels. Enjoy watching them explore their new digs and maybe even raise a family or two. Remember, building a squirrel box is not just about providing shelter, it's about fostering a connection with nature.

    So, get out there, build a squirrel box, and make a difference in the lives of these adorable creatures. Your backyard will thank you!

Continue reading

How to build a grill gazebo with room for a fire pit and bbq

How to build a grill gazebo with room for a fire pit and bbq

Building the Ultimate Grill Gazebo: Fire Pit and BBQ Paradise

Imagine this: You're hosting a backyard barbecue, the aroma of sizzling burgers fills the air, and laughter echoes around a crackling fire pit. But you're not huddled under a flimsy patio umbrella or exposed to the elements. Instead, you're relaxing in a spacious, sturdy gazebo, enjoying the perfect blend of comfort, functionality, and style. This is the dream you can achieve with a grill gazebo designed for both fire pit and BBQ enjoyment. Let's embark on this DIY project together, transforming your backyard into an outdoor oasis.

Planning Your Grill Gazebo: A Foundation for Fun

Before you start swinging a hammer, take the time to plan. This will ensure your gazebo fits your space and meets your needs.

Location, Location, Location:

Choose a level, well-drained spot in your yard. Consider the flow of your backyard, proximity to your house, and any existing utilities (like gas lines for the BBQ).

Size Matters:

Measure the area you want to cover and add a few extra feet for comfortable movement. A spacious gazebo is ideal for hosting, while a smaller one might work better if you're primarily using it for individual grilling sessions.

Material Choices:

Gazebo frames can be made from wood, metal, or a combination of both. Wood offers a classic look and can be stained or painted to match your style. Metal is durable and weather-resistant, often offering a more modern aesthetic. Consider your budget, desired style, and the specific needs of your project.

Building the Gazebo Frame: A Sturdy Structure

Once you've chosen your materials and designed your layout, it's time to construct the frame. This is the backbone of your gazebo, providing stability and support for the roof and walls.

Foundation and Posts:

Start by setting concrete footings or using pre-made concrete piers. These create a solid base for the gazebo's posts. The number and spacing of posts will depend on the size and design of your gazebo.

Framing the Walls:

Use pre-cut lumber or create your own frame pieces, carefully measuring and cutting to your specifications. Connect the posts with horizontal beams, creating the framework for the walls.

Constructing the Roof:

Decide on your roof type: A simple gable roof is straightforward, while a more complex hip roof adds architectural interest. Frame the roof using rafters and connect them to the top of the walls.

Adding the Finishing Touches: Enclosing Your Oasis

Now that you have a sturdy structure, it's time to create a truly inviting space. This includes adding the roof and wall coverings, as well as any decorative elements.

Roof Covering:

Choose a roof covering that complements your style and provides protection from the elements. Options include:

  • Metal roofing - durable and weather-resistant
  • Shingles - a traditional and versatile option
  • Canvas - a lighter and more breathable option

Wall Coverings:

Consider the level of privacy and wind protection you desire. Options include:

  • Screens - allow airflow while providing some privacy
  • Lattice panels - add a decorative element while allowing for climbing plants
  • Solid panels - offer maximum privacy and wind protection

Fire Pit and BBQ Integration: The Heart of the Space

Now it's time to integrate the fire pit and BBQ, making this gazebo the ultimate entertainment hub.

Fire Pit Installation:

Choose a fire pit design that suits your style and space. Consider both pre-made fire pits and building your own. Install the fire pit within the gazebo, ensuring adequate clearance from the structure and any combustible materials.

BBQ Placement:

Place your BBQ within the gazebo, ensuring you have enough space for grilling and access to gas lines or propane tanks if needed. If you're building a permanent gas line, have a licensed professional handle the installation.

Final Touches: Lighting and Finishing

Add the finishing touches to create a truly magical space.

Lighting:

Install overhead lighting for evening gatherings. String lights, lanterns, and even solar-powered options add ambiance.

Furniture and Decor:

Choose comfortable seating, a dining table, and any other desired furnishings. Add decorative touches like plants, rugs, and throw pillows to personalize the space.

With careful planning and a bit of effort, your grill gazebo will be a cherished gathering place for years to come, hosting laughter, good food, and warm memories.

Continue reading

How to build a diy wooden desk for a collaborative work area

How to build a diy wooden desk for a collaborative work area

Building a DIY Wooden Desk for a Collaborative Work Area

Creating a dedicated collaborative workspace can be a rewarding and cost-effective project. A DIY wooden desk, tailored to your specific needs and aesthetic preferences, can serve as the foundation for a productive and inspiring environment. This guide will walk you through the steps of constructing a sturdy and functional desk, ideal for fostering teamwork and creativity.

Planning and Design

The first step in building a DIY desk is meticulous planning, ensuring the final product meets your specific requirements.

Determine the Size and Shape

Consider the number of people who will be working at the desk, their individual workspace needs, and the available space in your workspace.

  • For two people, a rectangular desk with dimensions around 60" wide x 30" deep may be sufficient.
  • For larger teams, consider an elongated rectangular desk or a more complex shape, such as a U-shaped desk, to accommodate everyone comfortably.
  • If space is limited, a smaller desk with a central opening for shared use can be a practical option.

Choose the Wood Type

The choice of wood type significantly impacts the desk's appearance, durability, and cost. Some popular choices include:

  • Pine: Relatively inexpensive, light in weight, and easy to work with. However, it can be soft and susceptible to scratches.
  • Oak: Durable, strong, and with a classic look. It is more expensive than pine but offers excellent longevity.
  • Maple: Hard, dense, and with a beautiful grain pattern. It is slightly more expensive than oak.
  • Cherry: Rich in color and with a warm, natural appeal. It is a more premium wood choice.

Design the Desk's Features

Think about the features that will make your collaborative desk most functional and appealing.

  • Storage: Consider built-in drawers, shelves, or cabinets for organizing supplies, files, and personal belongings.
  • Cable Management: Incorporate cable trays or grommets to keep cords organized and out of sight.
  • Ergonomics: Ensure the desk height is comfortable for everyone, and consider adding adjustable features for customized comfort.
  • Aesthetics: Select a finish that complements your workspace and enhances the desk's visual appeal.

Materials and Tools

Once you have your design finalized, gather the necessary materials and tools:

Materials:

  • Wooden boards (based on your chosen wood type and dimensions)
  • Wood glue
  • Screws (various sizes and types)
  • Finishing nails
  • Wood filler
  • Sandpaper (various grits)
  • Wood stain or paint (optional)
  • Polyurethane or varnish (optional)
  • Drawer slides (if applicable)
  • Hardware (hinges, handles, etc.)

Tools:

  • Table saw or circular saw
  • Miter saw
  • Drill
  • Screwdriver
  • Measuring tape
  • Pencil
  • Clamps
  • Level
  • Safety glasses
  • Dust mask
  • Work gloves

Construction Steps

With your materials and tools ready, follow these steps to assemble your DIY desk:

Step 1: Cut the Wood

Using your chosen saws, cut the wooden boards to the precise lengths and widths required for your design. Be sure to account for any joinery or overhangs.

Step 2: Assemble the Frame

Start by constructing the desk's frame, typically using a rectangular or square shape. Join the boards using wood glue and screws. Make sure the frame is square and level using a measuring tape and level.

Step 3: Add Support Components

For larger or more complex desks, incorporate additional supports, such as cross-braces, to enhance stability. Position these supports strategically based on the desk's design.

Step 4: Build the Top

Create the desk top by joining together the chosen wood boards. Ensure the top is level and flat, as this surface will bear the brunt of the weight of your work materials. Use wood glue and screws to secure the top to the frame.

Step 5: Install Storage Features

If your design includes drawers or shelves, assemble and install them according to your plans. Use drawer slides for smooth operation and ensure proper alignment for easy access.

Step 6: Finish the Desk

Once the desk is assembled, smooth out any rough edges with sandpaper. Fill any gaps or imperfections with wood filler. Apply a wood stain or paint if desired. Once dry, seal the finish with polyurethane or varnish to protect the wood and enhance its durability.

Step 7: Install Hardware

Attach any hardware, such as hinges, handles, and cable management solutions, to complete the desk's functionality and aesthetics.

Safety Precautions

Building a DIY wooden desk involves using power tools and sharp objects. Always prioritize safety by:

  • Wearing safety glasses and a dust mask when working with wood.
  • Using work gloves to protect your hands.
  • Making sure the work area is well-lit and free of clutter.
  • Following all instructions carefully and using the tools correctly.
  • If using power tools, always double-check that they are properly plugged in and grounded.
  • Be mindful of fingers and limbs when working with sharp tools.

Customization and Finishing Touches

Once the desk is assembled, customize it further to suit your specific needs and preferences. Here are a few ideas:

  • Add lighting, such as task lamps or under-cabinet lighting, to improve workspace illumination.
  • Install a whiteboard or bulletin board for shared notes and ideas.
  • Create a dedicated area for shared supplies, such as pens, paper, and charging stations.
  • Choose a comfortable chair that encourages good posture and promotes team comfort.
  • Consider incorporating plants, artwork, or decorative elements to enhance the workspace's ambiance and inspire creativity.

Conclusion

Building a DIY wooden desk for your collaborative workspace offers numerous advantages: it provides a tailored solution to your specific needs, allows for creative expression, and can be a cost-effective alternative to commercially available desks. By following these steps and incorporating thoughtful design choices, you can create a space that fosters teamwork, productivity, and creativity. Remember to prioritize safety during construction and personalize the desk to make it a truly unique and inspiring workspace.

Continue reading
 

Wood duck box Copyright © 2016 | Powered by Blogger